How to Paint Furniture


The key to a successful furniture painting project is in the preparation. Surfaces to be painted need to have a dull finish so that primer will adhere to it. TSP or TSP Substitute can be used to degloss and prep surfaces, but if you have a very glossy finish, as in the table example below, "liquid sandpaper" is great alternative to sanding for speed and dust control.

Using the liquid sandpaper is my preferred method of furniture prep. I don't like sanding because of the dust that it creates, However, you should take precautions when using the chemicals by reading their directions. For more information on deglosser products click here.

If you have flaking surfaces, you will have sand the surface. All flaking surfaces have to be removed. If you have veneer damage, simply remove the loose pieces and fill the voids with a wood-filler and sand until smooth.

My preferred primer is the Kilz Original oil-based spray primer. This makes for quick work, but you must have a well-ventilated space and a spray area to catch the over-spray. If you don't have that, Kilz Premium water-based liquid primer is the next best thing.

Use 4" high-density foam rollers.for a brush-free finish. I use a brush for the edges and corners first, then use the roller for overall surface painting. The trick for no drips is to remember not to brush the paint over into an edge, always brush "off" of the edges.

For the best top coat use quality paint, such as Benjamin Moore. Use egshell finish for a washable matte finish. Pearl finish is a step above egshell and semi-gloss is the glossiest you can get in latex. Choose your finish based on the look and function of your piece.

Typically, you will need one prime coat and two top coats. If you are distressing your finished piece, you may only need one top-coat.

Have fun transforming your pieces!


Gather your supplies.

Nice dining table with a worn finish.

Table after primed and painted.

Table in it's new environment.


If you don't want to paint your own pieces, contact us and we can do it for you in our in-house workroom. Prices vary depending on condition and size of the piece.

Julie Fergus, ASID, is a nationally published interior designer. Her studio and showroom is located in Wolfeboro, New Hampshire. Julie's clients are primarily in the Lakes Region and Mount Washington Valley, however, she will travel throughout the state and North East. www.JulieFergus.com |

Cabinet Details

American Home Gallery can provide and install cabinets for your kitchen or bathroom. Here is a sampling of kitchens and bathrooms designed by Julie Fergus, ASID using our cabinet lines for custom solutions.

Click on the photos to view slide show of larger images.

Julie Fergus, ASID, is a nationally published interior designer. Her studio and showroom is located in Wolfeboro, New Hampshire. Julie's clients are primarily in the Lakes Region and Mount Washington Valley, however, she will travel throughout the state and North East. www.JulieFergus.com | www.DesignByMail.com


Cabinets built-in to knee walls to maximize the dead space.


Add caption


Drawers, drawers and more drawers.


Blind corner cabinet.


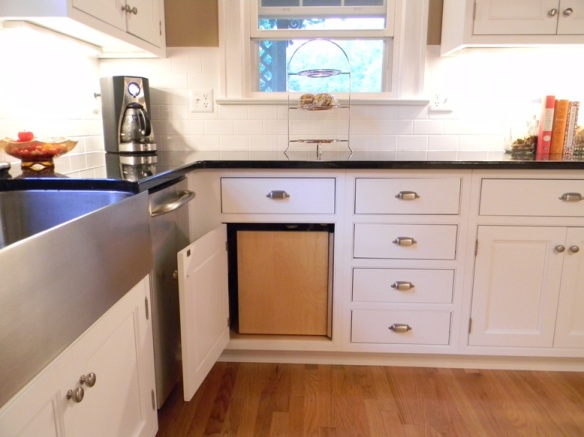
Double trash bins are good for trash and recycling.

Floor to ceiling pantry cabinets with adjustable shelves to maximize space.

Cherry cabinet with feet.

Wrap a free standing refrigerator with panels and cabinets.

Island with lots of drawers and micro cubby.


Spice rack on inside of door.

Lazy Susan.

Lazy Susan is great for small appliance.

Drawers are great for all of your wraps. The Micro cubby is functional.

Roll-outs for pots and pans.


Panty cabinet with roll-outs.


Remodeling Survival Tips

An additon can interfere with many interior spaces, and distrupt your life while under construction.
Remodeling Tips

Living through a remodeling project is not fun. If you can avoid it, live somewhere else while the major work is being done. Either way, dust control should be a major part of the set-up for any remodeling project.


My top 11 tips:

1. Have a clear, complete design plan. The only way to get competitive bids you can rely on is by an apples-to-apples comparison. You must have finishes, fixtures, appliances, cabinetry, lighting, and budget all defined in order to get accurate bids from a contractor.

2. Have a realistic budget!!!

3. Who is in charge? Whether you hire a contractor to be the general contractor or whether you do it yourself, decide who will be the decision maker when you are unavailable. You have probably underestimated how much time (and money) can be wasted when a crew of workers has no direction. Letting the contractor control your project or letting it “come together on the fly” and may result in costly mistakes. Avoid being your own general contractor if you don’t have a flexible job or if you are a long distance from the home being remodeled.

4. Prevent the project area from spreading to the rest of your space. Use plastic, tape, plastic, carpet runners, plastic, and fans to keep air moving from the clean space to the “dirty space” while keeping adjacent areas clean. And be safe…throw out the plastic when you are finished. Static electricity will adhere hazardous material like lead dust to your plastic. Throw it out when you are done.

5. Stay three steps ahead of the contractor and sub-contractors.

6. Choose all of your fixtures and have them on site as soon as possible. DO NOT wait until the contractor is asking for them.

7. Be patient and don’t panic when things are not running smoothly or perfectly. Building construction is only perfect on paper. On the job things nobody anticipated with always come up. Be ready for them. Learn to go with the flow and not exactly according to the schedule. You’ve got to be flexible. There is a lot of balancing and coordinating.

8. Pick your paint colors way ahead of schedule and paint test samples to be sure of your choices. Again, DO NOT wait until the day before the painter is coming to make your final choices.

9. If you have a strict budget, stick to it by not increasing the original scope of the project. In my experience, most projects that go over budget are due to the homeowner increasing the scope of the project, after the project starts.

10. If the scope of your project grows, the longer your project will take so plan accordingly.

11.Have fun along the way and perhaps a festive drink toast the progress (or to get you through it!)

Julie Fergus, ASID, is a nationally published interior designer. Her studio and showroom is located in Wolfeboro, New Hampshire. Julie's clients are primarily in the Lakes Region and Mount Washington Valley, however, she will travel throughout the state and North East. www.JulieFergus.com | www.DesignByMail.com
Bathroom remodels require a staging area outiside
of the the bathromm - plan accordingly
This is the staging area outside the bathroom.

Summer Colors

Summer is a great time to enjoy more vibrant colors. Porches are the perfect spot to explore color. For this porch we chose a bright blue for the floor then softened it with the colorful runners that had that same blue it them.

Lime green is a great contrast to the blue and we brought that color into the accents and the cushions.

Porch just aster it was painted.


Porch after the plants have been added.
Detail of the color combination.

Other fun combinations are pink and lime green, as shown in these Lily Pulitzer fabrics by Lee Jofa.